")
By Dean Law
We have this 1998 Chevy, 1500 Silverado K body with the check-engine light on. These systems are a little bit older, but they’re also a little bit easier to understand.

While the systems are booting up, I always like to just take a look at everything visually. Sometimes check engine lights can be just the result of simple things going wrong. It’s important to know whether or not the vehicle that you’re working on is a federal emissions or a California emissions model. There’s a sticker at the front of the engine bay that will give you all the particulars about the engine on this model. If you don’t see an air pump on there, it is federal emissions. If you see an air pump, it’s California emissions.
After booting up my diagnostic unit and checking all control modules, I recognized that today we have a fun one! We have a P0442, EVAP small leak detected. So what we do first, plain and simple, is grab “Old Smokey.” Now, to be honest, there are a lot of smoke machines out there and they can all work really well. I have a preference because anytime I’ve had a problem, Snap-on has taken care of me. I’m not saying that’s not what anybody else would do, but that’s been my experience. There are good tools from OTC, Redline, Snap-on and others.
Now we’re going to start to smoke the system, and here’s the problem: all EVAP systems, especially on the older models, have charcoal canisters, or in this case, one charcoal canister.
They have a line from the tank to underneath the hood. They used to sit underneath the hood and looked like a coffee tin, but then they went to the charcoal canister. And for some odd reason, I don’t know why they did this, but they just decided to take this charcoal canister and put it way in the back by the fuel tank on all vehicles. On this model, the charcoal canister is right up front in the engine bay. Just on the left side of it is what’s called the canister closing valve.
I strongly recommend that anyone who’s getting into electrical diagnostics today learn to read circuit design, how that circuit works, and read the wiring diagram. I’ve built a foundation and you can do this too. Build a foundation for understanding electronics. Plain and simple, electronics have really been operating the same forever, though we’ve become a little bit more sophisticated.
Now this solenoid would be commanded by the PCM. The PCM will give the canister closing valve the ground, which it should have power on all the time. You have to find out whether these are normally open or normally closed at rest, which means they’re not getting the command.
I already know these from experience, that this is going to have power and it’s waiting for a ground signal from the PCM. The way this system tests itself is, this PCM will close the canister closing valve and monitor the tank pressure.
That’s the second part on an EVAP system: first part is the canister closing valve, the second part is the canister. Third part is the fuel vapour supply from the fuel tank. The fourth part is the purge control solenoid.
But what we’re going to do right now is to find out which of those connectors are power or ground on this valve. So, is it ground side control or power side control? Now I’ve already told you that on this one it’s ground control, but let me show you how you could find out.
Take a test light and hook it up to ground anywhere on the body.
I don’t use the ground on the battery because that can send you in so many different directions. You can ground to the block, to a bracket, to the body, anywhere that’s metal.
Unless you get a cordless test light. These come in handy. This one’s a Snap-on EEC200. It uses your body as a conductor for the ground instead of having a wire. It beeps and has an LED light.
It doesn’t check for ground, it checks for DC, so let’s find out which one is power. Your body has to be grounded to any metal part of the body. When I probe it, we get a beep and light and know that the pink wire is power.
The reason we’re doing this is that we need to close off this valve.
If we don’t, the smoke machine is just going to fill up the canister and smoke is going to go pouring out of it. Now you can squeeze this line with a pair of vise grips, but I don’t really like to do that, especially on older vehicles. If you do, you’re probably going to break that line.
The best thing to do is to find out which one is power and which one is the ground signal. So I’m going to back probe the control wire. This is what normally grounds the PCM. And when you’re checking relays or anything else, it is vital that you know what part of the circuit you are checking or what part of the circuit you’re going to be activating. This is very good information, but only if you pay attention to what you’re doing.
Do not go and start putting power to a drive or a ground. If you ground the wrong side of this circuit, you can blow the PCM.
So you want to be on the control side of that load, not the power side of that load. You get on the wrong side of that, you’re going to see smoke coming out of the PCM. Not a good idea. If you ever get a load of codes after you’ve grounded the wrong circuit, that’s why. So I’ve set up a ground wire to the body with an alligator clip. And when I do that, it’s going to activate the solenoid and pull the plunger and seal off the canister closing valve.
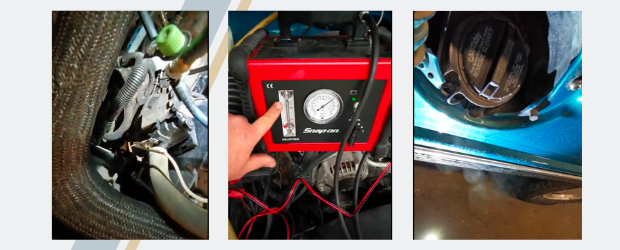
So once the valve is closed, we can activate our handy smoke machine. Now I’ve had to take out the Schrader valve. (And of course the core of the Schrader valve is a reverse thread. Something just to keep in mind.) So with the flow control on, it goes right to the top so we can see that we have a huge leak. The first thing we can do is grab our handy light, to look and see that the canister closing valve isn’t leaking.
There are some other lines that come off the canister as well.
I can’t see any leakage coming from those lines, but we do have a pretty big leak. You can take off the intake to make sure that there’s no leak coming from the purge control solenoid, but it’s going to take some time to fill up that intake if it is leaking from the purge control solenoid.
But if I step back here toward the fuel filler and take a good look, you can see smoke coming out; you can see a really significant leak. The problem is at the gas cap. Now, if I look inside the filler neck, I can see that there’s dirt and dust in there and the gas cap looks fairly old. So it’s not sealing very well at all.
That’s an easy one for today. We don’t have to get into the tank pressure sensor or the purge control solenoid or the canister closing valve. And yet again, “Old Smokey” here has proved its worth in gold.
But it’s still really important to know whether you’re finding out what’s powering it or grounding.
Look at the wiring diagram, find out what’s powering this or grounding. You will see a ground coming off or a power coming in from another joint connector or coming from the PCM or from a relay that’s turning on.
Dodges have an ASD (automatic shutdown) on a relay. Those will supply power to everything.
I believe this one here comes from the fused line and not the PCM.
I didn’t do this today, but I will definitely be looking at wiring diagrams and how to read wiring diagrams and circuit design. It will decrease your diagnosis time and increase the money you’re making.
You’re going to have to know your stuff.
And once you get a foundation on electronics, you can continue to add to it and use that foundation on circuit design, wiring diagrams, and understanding how things work.
You can apply it to almost every single vehicle or piece of electronics today. They all work the same. There is no secret.
0 Comments